How to Install a Lathem Sonachron Signal Timer
How to Install a Lathem Sonachron Signal Timer
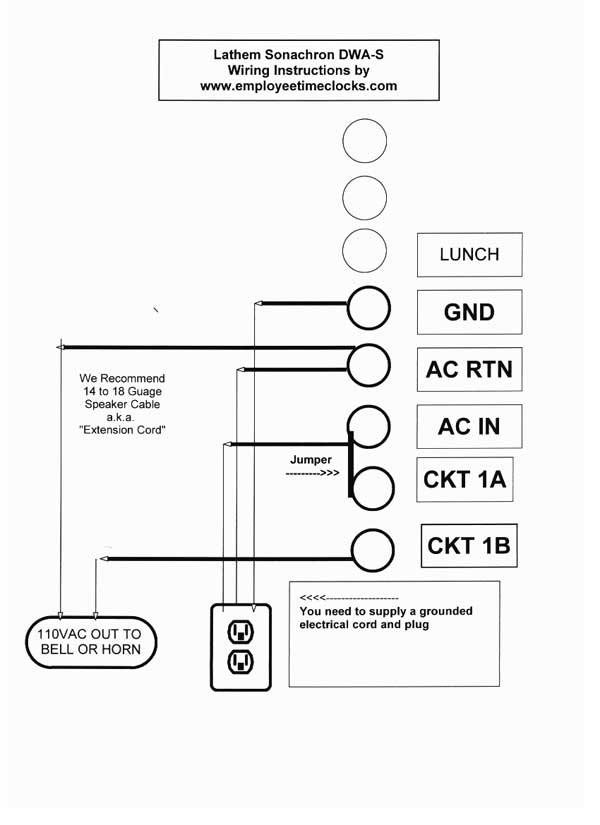
Original Context: The simple installation diagram referenced in this guide was originally created to help customers wire the system themselves. At the time, many facilities were converting from mechanical timers to programmable electronic signal controls. Today, while technology has evolved, the core wiring principles remain the same.
The Lathem Sonachron Signal Timer is designed to automate bell, buzzer, and horn systems in schools, warehouses, factories, and shift-based operations. It does not typically power bells directly. Instead, it controls a relay that activates your existing low-voltage signaling circuit.
Description
If you are installing a Sonachron, you are likely asking: “How do I connect this to my current bell system?” The answer is simpler than it appears. The Sonachron functions as a programmable switch. When the programmed time arrives, the internal relay closes, sending power through your signal circuit for a set duration.
In most buildings, the timer receives 120V power. The relay contacts then control a 24V bell circuit supplied by a transformer. The flow is straightforward:
Incoming Power ? Sonachron Timer ? Relay Closure ? Transformer ? Bells Ring
This method isolates high voltage from the low-voltage signaling circuit and keeps installations safe and serviceable.
Compatibility and Typical Applications
Sonachron timers are commonly installed in:
- Schools with class-change bells
- Manufacturing facilities with shift change horns
- Warehouses with break-time buzzers
- Churches and institutional facilities
If replacing an older mechanical timer, you will typically move the existing control wires to the Sonachron’s dry-contact relay terminals. If adding automation to a manual bell system, you may need to install a transformer and route the 24V control line through the timer relay.
For multi-bell systems, bells are normally wired in parallel and activated simultaneously through the same control circuit.
Installation and Electrical Considerations
- Verify voltage before wiring.
- Confirm relay amperage ratings.
- Use a contactor if driving high-current loads.
- Follow NEC and local electrical codes.
- Test manually before placing into daily operation.
After wiring is complete, program the current time, set signal schedules, and define ring duration.
Modern System Evolution
When this guidance was first developed, facilities relied on standalone programmable timers. Since then, signaling technology has expanded into network-based master clock systems and web-managed platforms. Modern cloud-hosted systems allow centralized schedule control, remote adjustments, and integration with paging and intercom systems—solving limitations that older timers could not address.
However, for facilities maintaining legacy bell wiring, the Sonachron remains a practical and cost-effective solution.
Related Products
- Pyramid 7000 Master Clock
- 24V Bell Transformers
- Bells and Buzzers
FAQ
Does the Sonachron power the bells directly?
Yes, and No. Your choice: Cold contact, or 110V.